When using rundialog, one can set a timeout period for the dialog to close even without any user input. When the timer expires, the dialog closes and acts as if the Ok button had been pressed. But I would like to be able to cause the closure to act like I pressed the Cancel button.
I modified the rundialog procedure (_DialogAlertLib,RUNDIALOG) by adding a variable fgTimedOut on line 673, then setting the variable to Yes if the timer runs its code, on line 685. One can then test if fgTimedOut = “Yes” after the dialog closes and change the default behavior.
It would be nice if this were built into the statement so we could control easier the response if the timer times out. Looks like it would be easy to do, since even I could do it.
The documentation states that this feature is intended for informational dialogs, which would only have one button. But, we have to have feature creep, right? (aka, a boy can dream)
The fact that you used the prefix fg makes me thing you created this as a fileglobal variable. But this really would need to be a global variable. So I considered adding this code on line 673
letglobal dlgTimedOut = false()
and this code on line 685
dlgTimedOut = true()
Then you could just use if dlgTimedOut as the test.
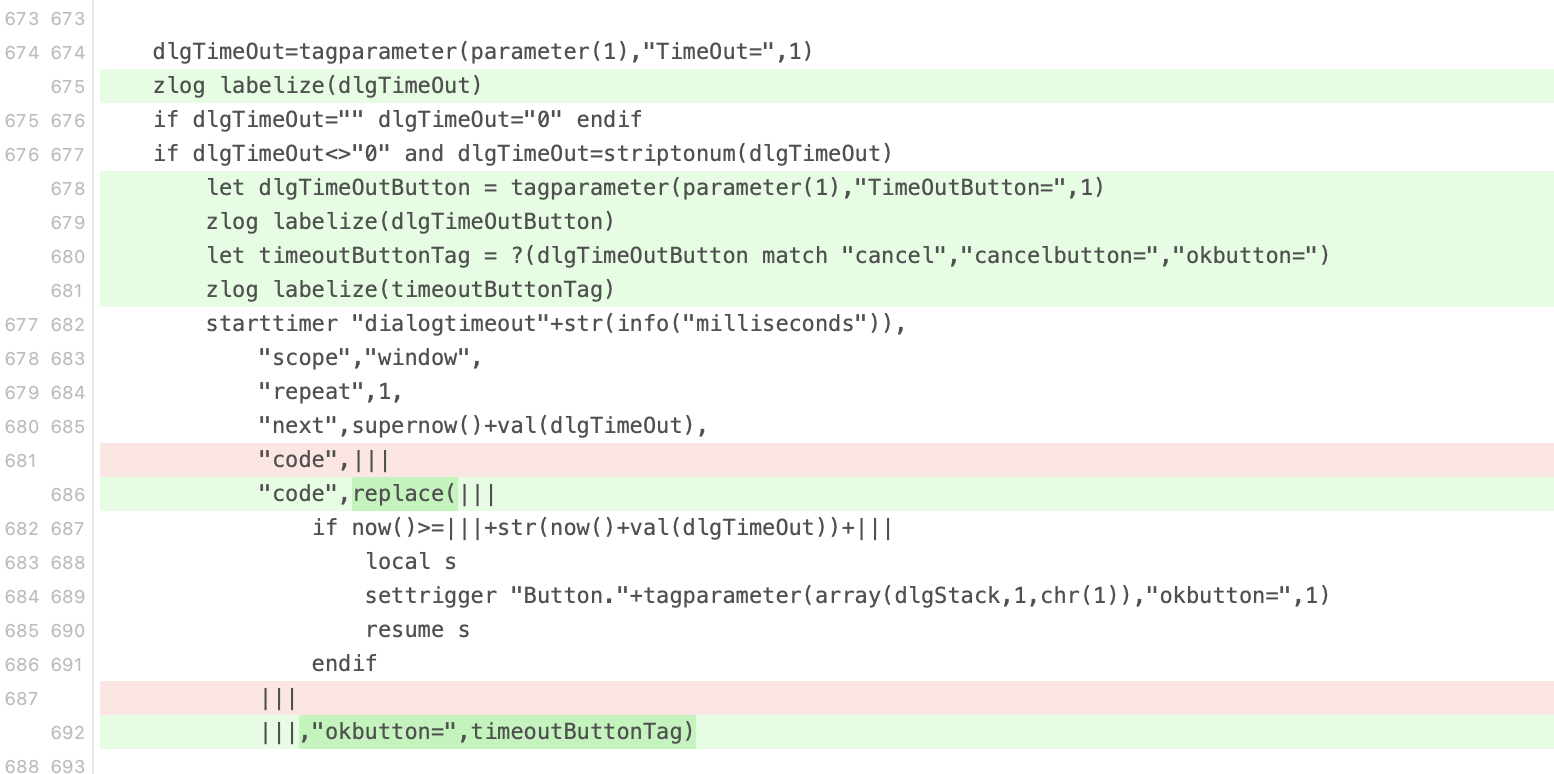
However, I would prefer to avoid adding another global variable, so I tried a different approach of adding a new option timeoutbutton=cancel that you can add to the dialog specification. This still only required 4 changed lines of code:
With a couple of additional lines of code, this works with superalert as well. If you look at the online documentation for rundialog and superalert you’ll see that this new feature is now documented.
In spite of the simple nature of this change, this still took 2 hours, mostly due to a frustrating detour that I won’t go into here
I was wondering if anyone would notice that. All changes to Panorama are tracked in a Git source control repository. Git allows you to go back and see exactly what changes were made when. That screenshot is from the Git client I use, which is called Fork, but virtually any Git client could produce a similar display (or even from the command line).
Being able to use Git this way was the original motivation for creating the blueprint feature. Blueprints turned out to be super useful far beyond that, but they originally were the answer to the question “how can I use Git to track changes to Panorama source code?”
Since most of you are probably unfamiliar with Git, here’s a link to the Wikipedia page. Of course there are reams of web pages and even books about Git, but this is a start.
As Tom says, Git is very handy However, it takes quite a bit of work to set up and learn. It’s definitely worth it for managing a huge project like Panorama X with hundreds of thousands of lines of code, but would be massive overkill for most Panorama users.